Showing posts with label 3-D. Show all posts

Monday, November 22, 2010

Christmas Projects


Here are a few cute Christmas projects. They're simple yet festive!

I used the Top Note die and Big Shot to make the little tote bag. A white sack is sandwiched in between and would be perfect for holding a gift card or a small present. The ornament on the front is a combination of 3 punches from the ornament punch, giving it a 3D look!

I couldn't resist using the adorable owl punch in Christmas colors. Do you like his little tie? I'm thinking of adding googly eyes for a fun touch.

The fabric brooches were made using the Island Floral die and the Big Shot. It's hard to see, but there are several layers and I also used some circles in a sparkly tulle. The edges are pulled for the 'shabby chic' look and everything is held together with a simple brad. I actually made these before I received my SU Christmas fabric. I now have it now, though, and will post a wreath project using the fabric, soon!


Tuesday, August 24, 2010

Open House Make-&-Takes + a FREE gift for everyone!

Here's the make-&-takes for my Open House Monday evening. This simple card features the new Friends Never Fade stamp set + Greenhouse Gala designer series paper. I love the bright and sunny Daffodil Delight! The 1 1/4" squre punch was used to punch the ds paper. The wording is from my new Fabulous Phrases set! I've been in need of some new word stamps. And the clear mount option is perfect for aligning 2 or 3 words together.


I also made each attendee a personalized little notepad. These feature the Newsprint DS paper, which I also love!! The red circles are Poppy Parade, which really looks great with the black/white. The monogram letters are from the Lovely Letters set, but this would also look great with the Rough Type alphabet- which was what I originally saw this project used with!I used the Bigz Scallop Circle die. The inside of each notepad is regular lined notebook paper, which actually runs through the Big Shot very easily. There's about 25 sheets of paper in each notepad and I think about half of them could be run through the machine at the same time. I used my Crop-o-Dile to punch a hole and tied it all together with some retired ribbon I had on hand. Definitely a fun project that makes a great personalized gift!

August Class Projects

Thanks to the 5 ladies who attended my August class last night! You all made it a successful evening! I hope everyone enjoyed the projects. I always love it when something is new to everyone! For those of you who missed out, we made a total of 4 projects:


2-in-1 Basket.I love that this is held together by a little binder clip ring, decorated w/ribbon! This basket uses a 6x6 piece of ds paper. Score at 2" all the way around. Then, score from each corner point to the middle & fold points in. Click here for a tutorial on how to make this PLUS the other basket option.


Owl Punch Paper Clip Bookmark. I love this little guy! And so easy- just choose your paper and punch! The hardest part is putting the tiny black eyeballs on the whites of the eyes. I used my stylus to help position them onto drops of liquid glue. The finished owls (front/back) were attached to the jumbo paper clip using large glue dots. Someone mentioned that you can find the paper clips at the dollar store! I think I got a big pack of these at the office supply store awhile back. If you don't own this adorable owl punch, you must get it!

Origami Shadowbox Card. I thought this was very striking! Love the effect! Just a square w/a few folds. Click here for detailed instructions.

Stencil Emboss Resist Card.This card kind of has a 'vintage' feel to it. You can get the stencil through SU and there's lots of possibilities for using it & it's very inexpensive! I lined this one up on vanilla cardstock and left a little off the paper. Then, I smooshed VersaMark on top of it, poured on clear embossing powder, & heated with my heat gun. Next, I used a sponge to apply color around the stencil. The embossing part of it 'resists' the ink and makes the image pop out! You can watch a video tutorial here.

If you have any questions, drop me an email!

Monday, May 3, 2010

Monday Class Projects- A Flower Theme!

Here are the four projects that we will complete at tonight's class. The theme is 'Flowers' which seems very fitting for the month of May!The Flower Pot Pocket Card has an insert with a message on it! I love this card because it's so bright and colorful! Next, is the Scallop Circle Tote w/Paper Flower embellishment. I love making these flowers & am excited to share with you! Very versatile and lots of options for different styles and looks. As you can see, there's a box in the middle of the two scallops for holding a small gift. Note the Crushed Curry cardstock- this is retiring, so if you love it, stock up before it's too late. The Eyelet Border Punch Flower card features yet another paper flower. Very pretty and definitely springy! This flower was made using a 1x12" strip of paper, punched w/the eyelet border punch, & run through the crimper. It's attached to a sticky-strip covered circle. Very fun to make!

The first three projects turned out to be a little more time & material-consuming than I originally planned. SO, the last project is a simple clothes pin magnet. Cute, easy, & still flower-themed! The flower is made from 4 tissue-paper scallop circles, made in the same way as the flower on the circle tote. I attached a magnet to the back which makes this the perfect cheery & useful accent for your fridge!


If you did not get in on the RSVP for tonight's class, feel free to email me to purchase the class kit, which will include all supplies needed + instructions to make these projects on your own!


Wednesday, April 28, 2010

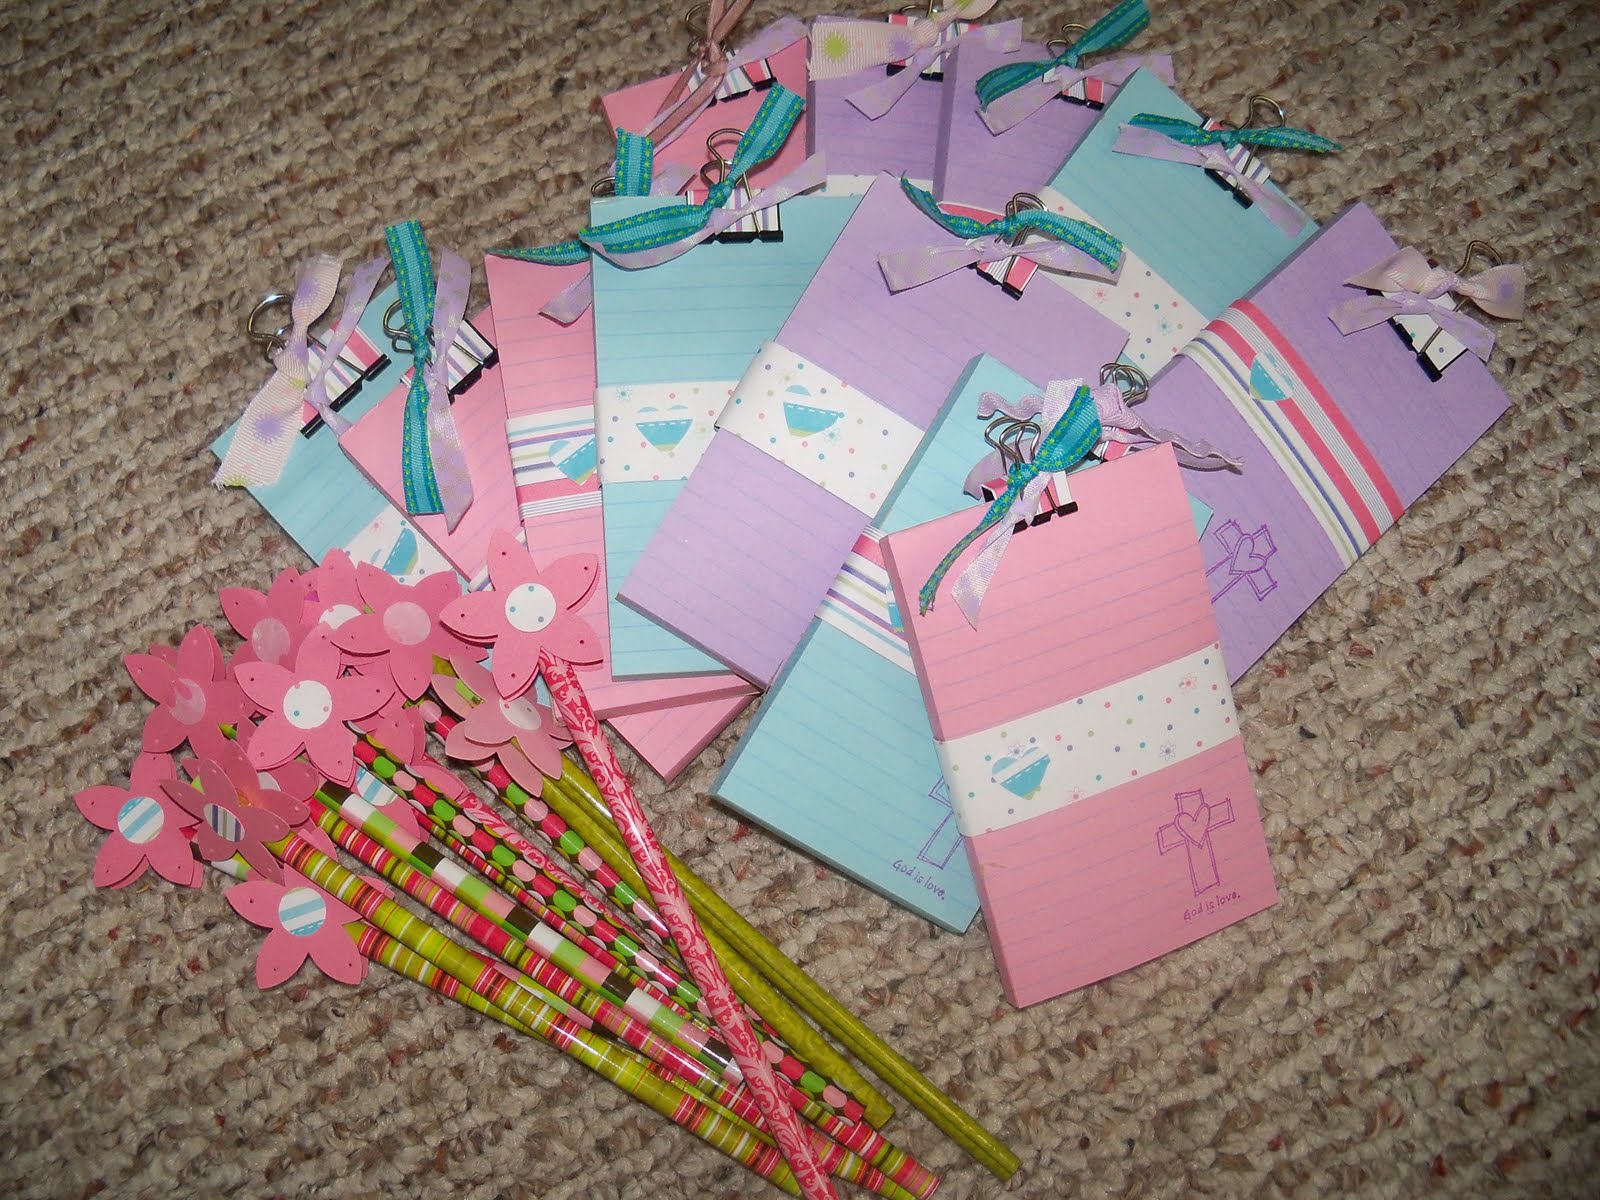
Embellished Notepad & Pencil Gift Sets

These are the little gift sets I made for the girls in my Awana class for an end-of-year gift. Somehow, amidst the chaos- school, feeding/bathing little ones, backed-up laundry, & last night's dinner dishes, I managed to get these made up! Sometimes I wonder how I get myself into volunteering for these projects!
I wrapped a simple 1" band around each notepad and glued a punched heart in coordinating paper. Then, I stamped the 'God is Love' image & attached the binder clip. The clips are embellished w/the same patterned paper + ribbons tied around each. I used the 5-petal flower punch for the flowers on the pencils. They're adhered w/glue dots- one on each side. I hope the girls enjoy them!

Monday, March 29, 2010

More Easter Class Projects- Simple Embellishments

Here's the rest of the Easter class projects for Monday night (see post below for the watercolor card which is also included). I love the fresh, springy colors! They're fairly easy to put together. Each one features a different embellishment that can really make a big difference in a card. Various sentiments may be substituted for occasions other than Easter. The 4x4 'Happy Easter' note card uses one of the Beautiful Wings Embosslits butterflies. The perfect finishing touch!The 'Happiness Always' card uses the SU Beautiful Butterflies die & vanilla hodgepodge hardware- always a WOW factor! I used Sweet Pea stitched felt + a button on the card with the cross. The basket is from the Baskets & Blooms SU die & a simple bow tied w/grosgrain ribbon. Click on any pic to enlarge. I still have space in Monday night's class, $10. Just drop me an email to join! Since I was so late in putting this all together, I will accept late RSVP's all the way through Monday. OR, if you can't make it to the class, I can put a kit together w/instructions.

Monday, February 8, 2010

Kissing Birds & a Hanging Heart Basket!

Here are the other 2 projects for my Valentine's Class tonight! I've seen the 'kissing birds' idea fluttering around several blogs- so cute. They are really adorable! I love the new punch! The cardstock is kraft & of course the Sending Love Designer paper. It's hard to tell from the pic, but I used a sponge to add burgundy ink around the edges of the birds and their wings to add dimension. I also popped up the wings.And this is my first attempt at making a Hanging Heart Basket using the Sizzix Petal Card die! Really easy. Click here for a short tutorial. The hearts & tag are die-cut from some little sizzlits. Besides 2 pieces of the 4.5x4.5 ds paper, I cut a 2x5 piece of real red cardstock which makes the 'pouch.' It's large enough for a small bag of candy or whatever other goodies you can think of! I used brads to attach my ribbon- simply b/cause I was running short. You could also insert eyelets or just punch a hole and knot the ribbon. Very easy!


Monday, February 1, 2010

Valentine's Projects

Here's a few Valentine's themed projects I've been working on. We will make these plus 2 more at my class next Monday, Feb.8! Please email me with questions or to RSVP!


The first card pictured features the new Sending Love Specialty DS paper from the Occasions mini. This paper is very pretty & sparkly-lots of glitter! I couldn't decide which pattern to use, so what better way to use 5 on one card than a patchwork pattern! Very little stamping required!

Next, is the new adorable little SU Mini Milk Carton! This box is really cute! I simply ran the Bigz die through my Big Shot & folded at the score lines. The little bird is from the hostess level 3, 'The More the Merrier' set, punched w/the 1.25" circle. I used yet another pattern from the Sending Love Specialty DS paper (12 in all to choose from!). I may add a band to this- not sure yet- but I wanted to get it posted for you to see. The little clip holds the top together. Just squeeze to open & reveal some goodies!

And the 3rd (but not final!) project is a neat little treat package! I noticed several of these on various blogs & they're so simple. I actually used one of my favorite retired paper patterns for this one. I believe it was offered on a SU clearance rack awhile back. Anyway, I love the color combo: Pretty in Pink, Chocolate Chip, & Taken with Teal. Untie the ribbon to open the circle flap. The cardstock is actually scored to hold something up to 1/4" thick. It's large enough to hold a cd or whatever else you can think of! Come to the class and be surprised at what I give you to put in here!

Well, that's it for now, but stay tuned for the other 2 Valentine's class projects! Hope to hear from you and see you there!

Tuesday, January 26, 2010

Baskets & Blooms Tea Bag Holder

This adorable little tea bag holder was actually cut from felt! So fun! I used the Baskets & Blooms exclusive SU die and ran it through my Big Shot (which happens to cut various materials). I changed the felt color for the large flower & added the green button and leaves. The tag is from the sizzlit 4pk- Lots of Tags. I did not use the basket bottom, so this one is flat. I used hot glue to seal the bottom and sides. Another option would be yarn or use your sewing machine.
I was originally inspired by another stamping blogger who had made something similar to these, so this is not totally original. Check out her blog here. The purple felt happened to match the Orchid Opulence perfectly, so I used the grosgrain ribbon to attach the basket to the teacup.

I actually gave this cute little set away at Monday night's class as a doorprize! Congrats, Jean!

More Sale-a-Bration projects!

Here's the additional card we made at Monday night's class. The Good Neighbor set was so much fun to work with! This is a Sale-a-Bration choice- FREE with any $50 merchandise purchase! Although I threw this card together literally right before the class, I can see endless possibilities for many more! The patterned paper is part of the Designer Series paper pad, Welcome Neighbor--also one of the Sale-a-Bration items which happens to coordinate perfectly with the stamp set!I used Whimsical Words (yet another Sale-a-Bration choice!) on the card front as well as on the little tag for the treat bag which goes inside the Fancy Favor bag! I love the 'loopy' script! And, as mentioned in my previous post, the Clear Mount blocks are totally awesome! They're especially convenient for word stamps, as you can see exact placement. Check out the pic- the classic rubber has not been compromised! And notice the dvd storage case in the background. Quite convenient & space-saving!And one final little fun project- So Cool rub-ons. I demonstrated how to use them on cute little 3x3 notecards. This is a cute package with fun color combo choices: bashful blue, basic grey, certainly celery, & bermuda bay. I added the little button + thread & stamped a sentiment at the bottom to top it off. I actually used a rub-on on the inside as well, but neglected to picture it. Tons of possibilities with these cute little things.

Wednesday, January 20, 2010

Fox & Friends


I have had so much fun playing with the new Fox & Friens set! It's absolutely adorable; definitely one of my new favorites! Here are a few of the cards I've put together which are contenders for my upcoming class on Monday. They're combinations of inspirations from various blogs & the catalog. The little box is made from the Fancy Favor die & will definitely be included in Monday's class. Notice the branches- they're punched from the new Extra Large Two-Step Bird punch. Now- what to fill it with?!Stay tuned for more projects! I'm looking forward to playing with the new Good Neighbors Sale-a-Bration set! Check out the turtle and owl card close-ups below. They both feature one of the new border punches- a choice option included in the Sale-a-Bration brochure.