Thursday, March 18, 2010

Scallop Circle Fabric Hair Barrettes

I was so excited to make these adorable fabric hair barrettes! I've seen various versions of these on different blogs. I was recently asked to come up with an easy craft project for our Awana TNT girls group at church. I immediately thought of these barrettes & this is my first attempt. I used a combination of scallop circles from sizzix SU Baskets & Blooms & Scallop Circle #2 dies. The circles are each hot glued together and kind of scrunched up, so they don't lay flat. After allowing time to dry, I used my paper piercer to poke a hole in the center and then inserted a brad. The final touch was pulling the edges of the fabric to slightly fray it, giving it a 'shabby chic' look.

The only snap barrettes I had were Isabella's size, so that's what I used for this one. Here's some pics of her wearing one. Very cute & fun! Stay tuned for more of these using different fabrics and a slightly different format, including a brooch!

Sweet Pea Stitched Felt

I love the Sweet Pea stitched felt pieces! This card features several of them. Colors used: Certainly celery, rose red, pretty in pink, and chocolate chip. I also like the simple block layout. You could easily change this up with different images or embellishments in each block.

Another Butterfly Card!


I am enjoying the embosslits butterflies! They're pretty and can make a really quick and easy card! This one is also a fun & bright color palette on whisper white.

Friday, March 5, 2010

Embosslits Beautiful Wings!


My new embosslits butterfly die just arrived and I couldn't wait to try it out! I love the fact that this die embosses and cuts multiple images at the same time! This was a super-quick card that I needed to make for someone, so it's nothing fancy. I like the color combo- fresh and bright! I used Old Olive, Bashful Blue, Pumpkin Pie, & Pixie Pink. Since the butterflies are already textured, I thought I'd throw in a few more textures for added interest. The corderoy button worked well & then I embossed the white cardstock with raised dots. Very simple!

Tuesday, March 2, 2010

Embellished Cloth Diaper


Well, this is officially my 2nd sewing project! This one isn't super SU related, but I figured I would post it since I did use SU ribbon (although retired)! This is a Gerber pre-folded cloth diaper, which can be purchased in packs of 12. I chose a soft flannel fabric, cut the fabric 8" wide and about 19" long, which allows for 1" sides to be folded under. I pre-washed everything before I started & then ironed well. This is supposed to eliminate any future shrinking, if you wash it in hot water. I lined each side with ribbon and pinned it all together before taking it to the machine. Then, I simply ran 2 seams along each side and one on each end. I think these would make great baby gifts! And of course since we're expecting a new little boy in June, this one will come in handy for him!
I hope to try some more of these. The biggest challenge is the cloth diaper loosing a little of it's shape, which can make cutting and measuring a little difficult. Apparently the pre-washing is definitely a must! Check out the directions I followed here.

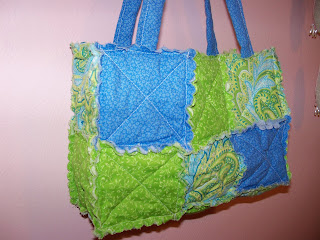
Rag Quilt Purse with the Big Shot!

Well, I finally got the opportunity to play around with the Big Shot for a sewing project! My grandmother recently gave me her sewing machine & I was excited about trying it, although I have no sewing experience! Through the blogging world, I kept hearing that the rag quilt purses were so easy and no big deal! Well, they were basically right!
This was a fun project and pretty much on a beginner level. My mom, who is a veteran seamstress, actually helped me. I was fairly pleased with how this turned out, however, I did use the wrong batting. Apparently there's a big difference between cotton and polyester batting- I had no clue. The cotton batting (preferred) gives a more stiff affect to the bag & a little more form. I was super frugal in choosing my fabric, but I really like the color combo. One half yard of each pattern cost me a little over $4!

I used the Big Shot and the scallop square die. I cut the fabric appx 5"x5," layered 8 pieces at a time, and ran them through the Big Shot. I can definitely see how quilters would benefit from the scallop square! The die eliminates tedious cutting and measuring.

I cut a total of 32 squares. Each is sandwiched with another square + a piece of batting in between. The first step was to sew an 'x' across each sandwiched block. Then, the scalloped edges were joined and sewn together as well. You can find a great step-by-step tutorial here.

I neglected to add a clasp before sewing the final edges, so this is an open bag. I thought about adding some velcro for a closure and some buttons on the outside to dress it up. The bag can be turned inside out for the clean-edge look or as pictured for the rag quilt look. I did have to go back and snip all the edges and wash/dry the entire bag to give it the final 'rag' look. I really need to get a sharp pair of scissors for fabric cutting!

There are several variations to this bag and it's easy to adjust the size. I'm looking forward to trying another one of these soon!- preferably in a larger 'tote' size.

Monday, February 8, 2010

Fox & Friends Invites


I just can't get enough of this adorable Fox & Friends set! I had to restrain myself from using it for any of the Valentine's class projects, since we just used it at my class 2wks ago. However, I decided they worked perfect for these invites! I totally C.A.S.E.D. this idea from the very talented Mary Jo Albright. Click here to see her original. Luckily I only needed to make 4 of these cards. They are EXTREMEMLY time consuming- but well-worth the effort! The tiny pieces of patterned paper were painstakingly cut from the Sale-a-Bration paper. All the circles were popped up w/dimensionals. Lots of cutting, but a really cute effect! Cardstock: Taken with Teal, Kraft, Chocolate Chip, Real Rust, Old Olive, & Crushed Curry.

Kissing Birds & a Hanging Heart Basket!

Here are the other 2 projects for my Valentine's Class tonight! I've seen the 'kissing birds' idea fluttering around several blogs- so cute. They are really adorable! I love the new punch! The cardstock is kraft & of course the Sending Love Designer paper. It's hard to tell from the pic, but I used a sponge to add burgundy ink around the edges of the birds and their wings to add dimension. I also popped up the wings.And this is my first attempt at making a Hanging Heart Basket using the Sizzix Petal Card die! Really easy. Click here for a short tutorial. The hearts & tag are die-cut from some little sizzlits. Besides 2 pieces of the 4.5x4.5 ds paper, I cut a 2x5 piece of real red cardstock which makes the 'pouch.' It's large enough for a small bag of candy or whatever other goodies you can think of! I used brads to attach my ribbon- simply b/cause I was running short. You could also insert eyelets or just punch a hole and knot the ribbon. Very easy!


Monday, February 1, 2010

Valentine's Projects

Here's a few Valentine's themed projects I've been working on. We will make these plus 2 more at my class next Monday, Feb.8! Please email me with questions or to RSVP!


The first card pictured features the new Sending Love Specialty DS paper from the Occasions mini. This paper is very pretty & sparkly-lots of glitter! I couldn't decide which pattern to use, so what better way to use 5 on one card than a patchwork pattern! Very little stamping required!

Next, is the new adorable little SU Mini Milk Carton! This box is really cute! I simply ran the Bigz die through my Big Shot & folded at the score lines. The little bird is from the hostess level 3, 'The More the Merrier' set, punched w/the 1.25" circle. I used yet another pattern from the Sending Love Specialty DS paper (12 in all to choose from!). I may add a band to this- not sure yet- but I wanted to get it posted for you to see. The little clip holds the top together. Just squeeze to open & reveal some goodies!

And the 3rd (but not final!) project is a neat little treat package! I noticed several of these on various blogs & they're so simple. I actually used one of my favorite retired paper patterns for this one. I believe it was offered on a SU clearance rack awhile back. Anyway, I love the color combo: Pretty in Pink, Chocolate Chip, & Taken with Teal. Untie the ribbon to open the circle flap. The cardstock is actually scored to hold something up to 1/4" thick. It's large enough to hold a cd or whatever else you can think of! Come to the class and be surprised at what I give you to put in here!

Well, that's it for now, but stay tuned for the other 2 Valentine's class projects! Hope to hear from you and see you there!

Tuesday, January 26, 2010

Baskets & Blooms Tea Bag Holder

This adorable little tea bag holder was actually cut from felt! So fun! I used the Baskets & Blooms exclusive SU die and ran it through my Big Shot (which happens to cut various materials). I changed the felt color for the large flower & added the green button and leaves. The tag is from the sizzlit 4pk- Lots of Tags. I did not use the basket bottom, so this one is flat. I used hot glue to seal the bottom and sides. Another option would be yarn or use your sewing machine.
I was originally inspired by another stamping blogger who had made something similar to these, so this is not totally original. Check out her blog here. The purple felt happened to match the Orchid Opulence perfectly, so I used the grosgrain ribbon to attach the basket to the teacup.

I actually gave this cute little set away at Monday night's class as a doorprize! Congrats, Jean!

More Sale-a-Bration projects!

Here's the additional card we made at Monday night's class. The Good Neighbor set was so much fun to work with! This is a Sale-a-Bration choice- FREE with any $50 merchandise purchase! Although I threw this card together literally right before the class, I can see endless possibilities for many more! The patterned paper is part of the Designer Series paper pad, Welcome Neighbor--also one of the Sale-a-Bration items which happens to coordinate perfectly with the stamp set!I used Whimsical Words (yet another Sale-a-Bration choice!) on the card front as well as on the little tag for the treat bag which goes inside the Fancy Favor bag! I love the 'loopy' script! And, as mentioned in my previous post, the Clear Mount blocks are totally awesome! They're especially convenient for word stamps, as you can see exact placement. Check out the pic- the classic rubber has not been compromised! And notice the dvd storage case in the background. Quite convenient & space-saving!And one final little fun project- So Cool rub-ons. I demonstrated how to use them on cute little 3x3 notecards. This is a cute package with fun color combo choices: bashful blue, basic grey, certainly celery, & bermuda bay. I added the little button + thread & stamped a sentiment at the bottom to top it off. I actually used a rub-on on the inside as well, but neglected to picture it. Tons of possibilities with these cute little things.

Friday, January 22, 2010

Of the Earth, Bleached!


Well, here's the bleached effect using the hostess: 'Of the Earth'. This is actually a catalog C.A.S.E. I was trying to choose another level one set with my last order and noticed the SU sample using this set. Of course I slightly altered mine, but I really love the finished product! As I had predicted, this set is really great for use with bleaching! I actually cut & stamped a few extras, which I usually neglect to do, so I will be putting together some more. The Kraft cardstock is perfect for this earthy set, and I thought the button and hemp twine really coordinated nicely as well. The other cardstock colors I used are: Really Rust, Lavendar Lace, Old Olive, & So Saffron- a new combo for me! The sentiment & the bird in the middle were stamped with tone-on-tone color; no bleach.

Also, notice the 'happiness always' sentiment- part of the Sale-a-Bration merchandise. I love the loopy script! And I ordered that set in the new Clear Mount! You wouldn't believe how great these clear mount stamps are! There's no loss of quality b/cause they still use the same classic red rubber used on the wood blocks. They just stick onto a clear mount block and include a label so that you can see what you're stamping + where you're stamping it at! Very cool!

Quick & Easy Welcome Cards


Here's another batch of church welcome cards. I used the hostess 'Of the Earth' set. This wasn't
one of my favorite sets, originally, but it's really easy to use and great for quick cards. I'm looking forward to using it with some bleach and maybe even a candle! I also stamped the envelopes- something I usually neglect to do, but it really does add alot. Cardstock & ink colors used for these cards: Ruby Red, Old Olive, So Saffron, & Kraft.

Wednesday, January 20, 2010

Fox & Friends


I have had so much fun playing with the new Fox & Friens set! It's absolutely adorable; definitely one of my new favorites! Here are a few of the cards I've put together which are contenders for my upcoming class on Monday. They're combinations of inspirations from various blogs & the catalog. The little box is made from the Fancy Favor die & will definitely be included in Monday's class. Notice the branches- they're punched from the new Extra Large Two-Step Bird punch. Now- what to fill it with?!Stay tuned for more projects! I'm looking forward to playing with the new Good Neighbors Sale-a-Bration set! Check out the turtle and owl card close-ups below. They both feature one of the new border punches- a choice option included in the Sale-a-Bration brochure.

Thursday, January 7, 2010

Scrapbooking Isabella

Here's a recent page layout that I scrapbooked for Isabella's album. These pictures are absolutely beautiful & my photo doesn't do them justice (flash and all). Anyway, I used Basic Grey cardstock for the background & Razzleberry Lemonade designer paper, featuring the Curry color. I loved the combo! I embellished with Fleurettes Flowers & corderoy brads. Simple and beautiful!

Isabella's party


To follow up with my previous post, here's some pics from Isabella's b-day party. I didn't end up having the time to make lots of decorations, so the napkin ring was the only project that got done. I used the Beautiful Butterflies die and Sweet Always (retired) paper + my Big Shot to cut. I stuck a rhinestone embellishment in the center of each and tied the napkin with ribbon. I used various coordinating patterns of paper. And that was it!
I think she enjoyed her party. She had her own little cupcake and was unsure, at first. But then she started digging in! Being the little lady she is, though, she didn't appreciate the messy hands:) I ended up taking it away from her before she ate the whold thing, so she wouldn't get sick. I still can't beleve she's now one!

Monday, December 14, 2009

Isabella's 1st Birthday Invitations

These are the birthday invitations that I made for Isabella's party. I can't believe she'll be one on Friday. I had a hard time finding a stamp that I really wanted to use, so I actually purchased a digistamp online. This was something new to me. These digital images can be purchased and downloaded to your computer. You can then print the image from your printer onto cardstock. While it sounds convenient, there are definitely some drawbacks. Although I waited an entire day, the ink from my printer slightly smeared while using markers to color the image. Also, you have to figure out how big you want the image in order to size it correctly onto the cardstock, before printing.
I was pleased with this particular card, however, I think I'll stick to my classic stamps and ink. I did use SU's Regal Rose and Pretty in Pink cardstock + Sweet Always (retired) designer paper. The 'Isabella' wording is from one of SU's personalized stamps. I used Dazzling Diamonds on the wings & little crystal stick on jewels everywhere else. I also used the eyelet border punch for the side border strip. I plan to cut some butterflys from my Big Shot for some of the birthday decor- which I will try to post later.

Thursday, December 10, 2009

My First Onesie Card!


This was my first attempt at a baby onesie card! But I don't think it will be my last! This was so simple and turned out absolutely adorable! I used Lauren Meader's tutorial which can be found here. I slightly altered the instructions, using the eyelet border punch for the sleeves & tying pretty ribbons around them. So sweet for a girl baby. I also added the buttons at the bottom. I used white craft ink for the stamped flowers. I think the crocheted flower tops off the project.

Christmas Workshop Projects

Here are the projects from my Christmas workshop. Thanks to the ladies who attended! There were a total of 9 projects: a small gift box w/candy, candle, gift card holder, chipboard ornament, set of gift tags, & 4 cards. Click on any picture to enlarge..I used some of SU's new shimmer paint on the skater's clothing for this old fashioned card. It gives a subtle sheen & is fun to use. Dazzling diamonds give the simple snowman card some pretty glitter.
A tutorial for the gift card holder can be found here. Very simple. Requires a few scores, folds, & the word window + small circle punch. The gift tag set is a hostess set, and each stamp has a coordinating punch. Easy and fun! The chipboard ornament & small gift box were both cut using Big Shot dies.
I'm looking forward to my final class of the season- this Sunday!

Monday, December 7, 2009

Christmas Blessings Canvas, for sale

This is a project that was inspired by another project I made this summer for my kitchen (found here). It's another canvas picture! This one is a little smaller than the original. It's appx 8"x10". The canvas was painted a brick red. I used a piece of Old Olive cardstock for my background. The other colors were pulled from the Merry Moments designer paper: Real Red, Garden Green, & Chocolate chip.
The ornament images were stamped and then punched with the coordinating punch & popped up with dimensionals. I used shiny silver cord for the ornament string & also tied it in the buttons. 'Christmas Blessings' was also popped up for a dimensional look.

I originally made these for a private workshop for a friend of mine, & I have about 6 kits left. They're $20each, & I will put everything together for you, or sell as a kit for you to complete. The canvases are pre-painted & all paper will be cut, so the hard part is done for you! Please email me to purchase (maliamarie20@yahoo.com)!

Monday, November 30, 2009

Grateful Thoughts


Here's a card that I recently demonstrated at a workshop. The featured stamp set is the adorable Falling Leaves- such a cute set! This card is so simple, yet I think it makes a statement with the cute mini clip and the beautiful fall colors. I love the Summer Sun against the Rich Razzleberry! The middle leaf & the Grateful sentiment are popped up with dimensionals. I tore the bottom edge of the Razzleberry for added interest. Click on the pic to enlarge. The curvy words (part of the set) are really cute!

Tuesday, October 27, 2009

Final Deal of the Week

The final deals of the week are from October 26, 10 AM (MT) through October 31, 11:50 PM (MT).
Item 116214, pg.174, Princess Party Kit- reg.15.95, special= $9.99
Item 116213, pg.175 Pirate Party Kit- reg.15.95, special= $9.99

Thursday, October 22, 2009

SU Deal of the Week #3

Just a quick (belated) update w/this week's deal of the week:
The third deals of the week are from October 19, 10 AM (MT) through October 26, 9:50 AM (MT).


114348, Basic Jumbo Grommets, SALE $4.49
109857, Mini Library Clips, SALE $8.99
112571, Circle Designer Brads, SALE $3.99
112581, 1/2" Library Clips, SALE $3.99


EMAIL me to place your order today.....

Wednesday, October 14, 2009

Deal of the Week #2

The second deals of the week are from October 12, 10 AM (MT) through October 19, 9:50 AM (MT). They are all Big Shot items.

Item #115961- p. 200 Perfect Setting Bigz XL die
Reg. $42.95, SALE: $25.99

Item #114515- p.195 Flower Burst Embosslits die
Reg.$11.95, SALE: $5.99

Item #116760- p. 201 Pop-Up Three Tier Cake Bigz XL die
Reg.$39.95, SALE: $25.49