Wednesday, February 9, 2011

Easy Kid Valentine's!


Today, I whipped up these easy 'kid' valentine cards for Gabriel's friends in his Cubbies class. They're 3x3 in various cardstock colors. The easiest were the ones with rub-ons! I had a package of the retired 'So Cool' and thought they'd be perfect. Gabriel liked the cute robots, animals, and sayings. After we ran out of the rub-on option, I pulled out my Fox and Friends set! I did have to stamp the animals onto white cardstock, punch, and then adhere to the card because the colors came out better. I also added fun little stamped messages from various stamp sets. I then used the small heart punch for each card to add a bit of Valentine flair! I love all the fun color combos, and no two are the same! We added packages of Fun dip to each colored envelope for a sweet treat! Fun & cuter than a store-bought box!!


Thursday, February 3, 2011

Home Decor: My Bathroom Art

Here's another project that I neglected to post after finishing it. I needed something for a wall in my bathroom, so I decided to go DIY style! I actually made 2 of these, but one got accidentally broken during taping up the backing:( I will spare you the details!

I purchased the frame(s) at Ross for $6-for both! You can't beat that! I liked the shape, matting, and the dark wood color. I removed the original wine bottle pics and simply inserted my own!Much better, huh?
I used the Greenhouse Gala designer series paper. I cut a background piece to fit the inside of the mat where the previous picture had been. Then, I actually cut flowers & a leaf from the patterned paper! I used buttons to give it some dimension. And it was that simple!


Monday, January 17, 2011

Polka Dots -n- Stripes!

Here's another rag quilt bag I made back in October. I think I forgot to post it. This was a special order for someone and the fabric was upon request. Cute combo! I'm charging $25 for this size (9 square front). Email me with questions!


Tuesday, December 28, 2010

Deck the Halls....with a cute Rag Wreath....

fa-la-la-la-la....la, la, la, la.....I couldn't resist the tune:) Well, 576 fabric strips later...I finally finished my 1st rag wreath! Actually, I should multiply that by 10 more that I cut for the wreath class last week- hence the late post!! Needless to say, I am pleased with the outcome and from the feedback I've received, so was everyone else who made one. It was fun to see the variety as several ladies chose their own fabrics:)
Unfortunately, I do not get to personally enjoy the one I made. BUT, the friend I gave it to was very happy with it! The great thing about this fabric is that it can be used year-round for anyone who has decor to match! I love the subtle greens and the deep red really 'pops'. I'm actually in the process of making another one to give to my mom.
Not sure if you can tell, but I added various strips of crochet trim throughout the wreath, as an afterthought. It fits in really well and gives it a little texture. I finished it off with the wide Riding Hood Red/Vanilla grosgrain ribbon for a hanger (from the Clearance Rack!). The color is a little off, but I think it works. As an alternative, you could cut a wide strip of fabric and use that as a hanger (I learned this from one of the ladies at my class!).

Here's the details, if you'd like to try one on your own:

I purchased a wire wreath frame from a local craft store. It was 12" across and had 6 sections with 4 wire rows in each section. After playing around with it a bit and figuring the amount of fabric I had, I decided to use 21 strips for the 2 inner rows and 27 strips for the 2 outer rows. That's 96 pieces/section. This works out perfectly when you use 4 fat quarters (18"x22" pieces). I cut the strips 6" x 1/2". You can see part of the frame in this pic.Choose a section to begin with and work your way one row at a time from the 2 inside, up to the 2 outside rows. After finishing a row, fold the strips down to make it easier to continue to the new row.
After each section, check the back of the wreath and make sure all of the tails are pushed to the front. This will keep your wreath full. You can fluff it out after each section and when you're done.
Each strip is tied one time, not knotted.
There are alot of variations for these wreaths, so feel free to get creative! I was precise with my measurements and numbers mainly because I was cutting for a group and had to make sure the fabric amounts were correct. However, I also wanted to make sure it looked even when it was complete.
It's that simple!! Be advised, though, if you try this at home, allow plenty of time for cutting. I underestimated this part of the project. Not too bad if you're making one for yourself or a gift, but it took AWHILE to cut everyone's for the class.
I like the larger 1" strips, but it required more fabric, so it didn't work for my class.
I used my rotary cutter, however, I did see some suggestions for tearing fabric as opposed to cutting it. This did not work for 1/2" pieces, but did work a little better for the 1" size. It does give it a more 'rag' look and not all pieces turn out the same width, so again, not an option for my class.
There are lots of resources on the web for this technique, so check them out and let me know if you decide to give it a try!

Sunday, December 5, 2010

Fabric Canvas Trio- a fun project!

I took my free time this weekend to work on a fun project that I've been itching to finish! I covered 3 canvases with adorable little girl fabric for Isabella's room! She recently moved out of the crib and into a 'big girl' toddler bed (therefore freeing up the crib for Josiah)! How weird to not see a crib in the corner anymore, after being there for 4 years!
Anyway, I decided the canvases needed dressed-up, so I embellished them all differently.I love this dainty Tea & Sweets fabric! This busy pattern didn't call for much, but I wanted to add a little dimension. I used some of the SU crocheted fleurettes (on the Clearance Rack, here) with Sherbert designer buttons (click here- also on Clearance Rack!) in the middle, and draped ribbon in between. Check out the cute rick-rack from the retired Fairy Tales ribbon bundle (previously on the Clearance Rack).
And who could resist this yummy cupcake fabric! This was simple enough to embellish. I continued the twisted ribbon draping and attatched two fabric flowers on each end. They were made from scallop circles with my Big Shot. I folded several and hot-glued them together.
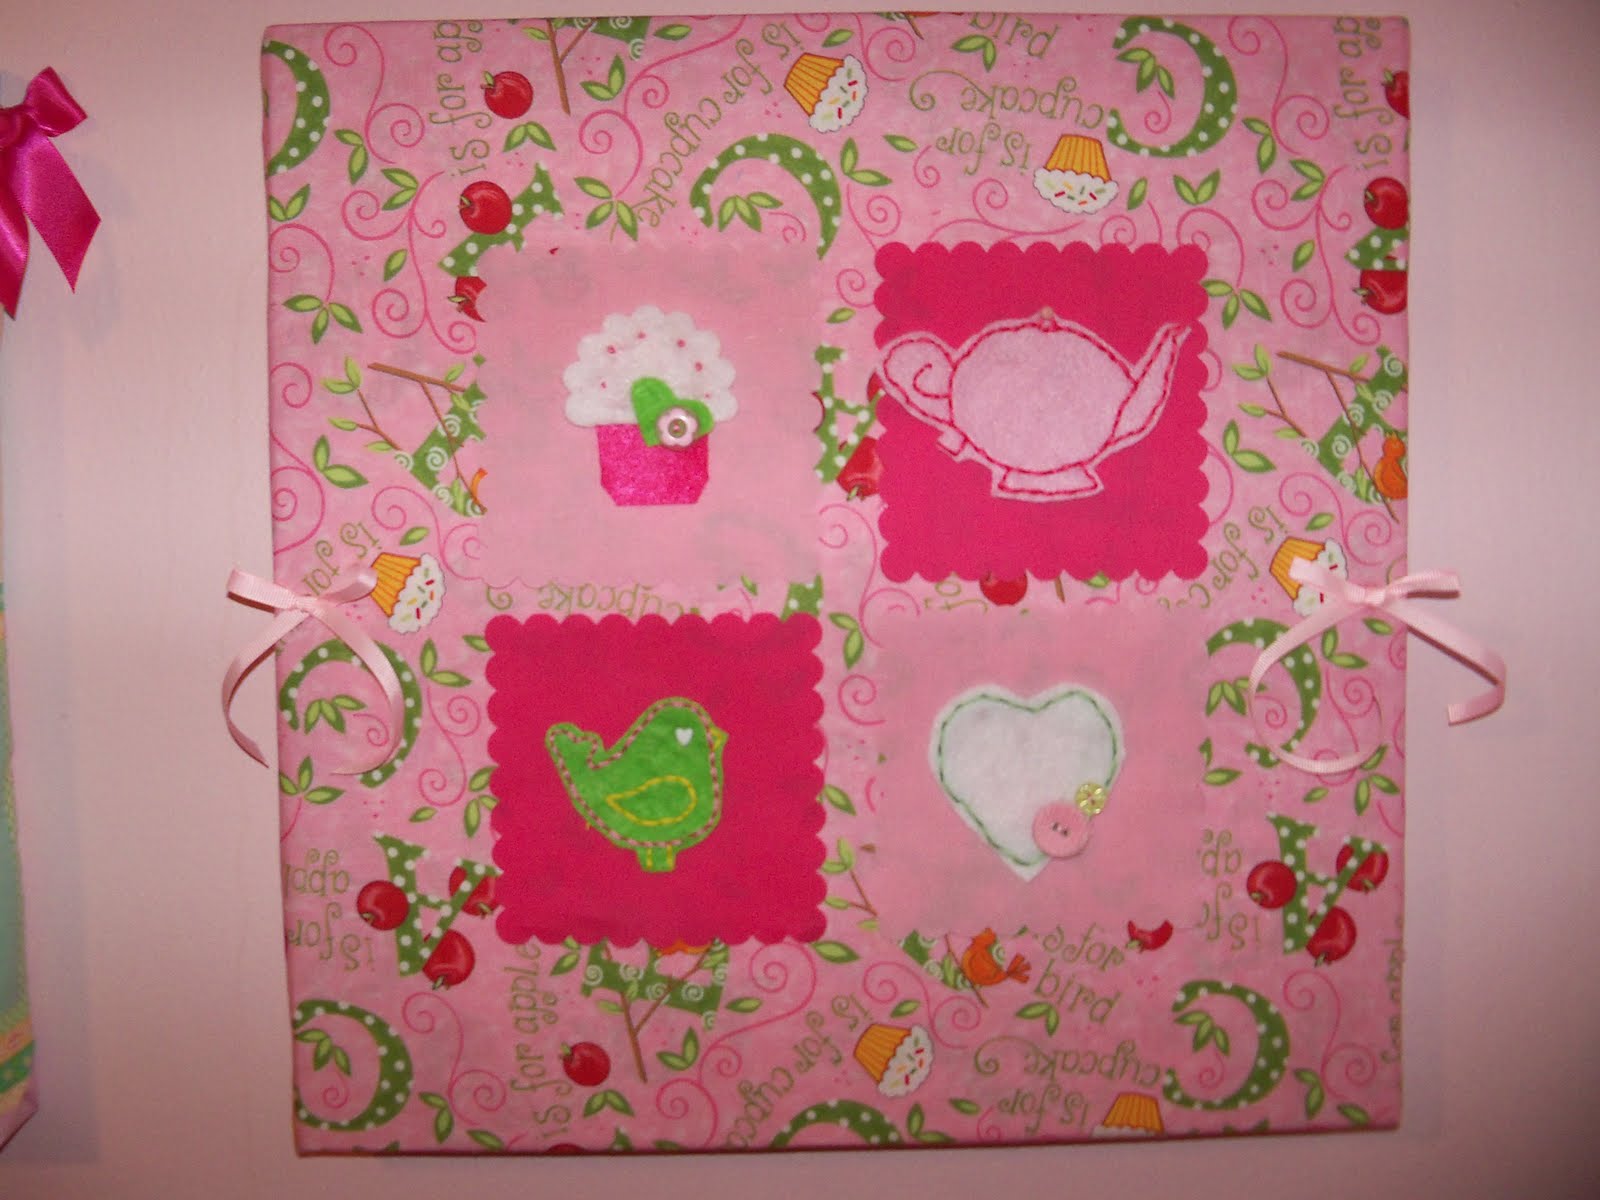
And lastly, this was the most time-consuming canvas. The fabric is a busy pattern, but it's small, so nothing stands out, specifically. I decided to break it up with the scallop squares and a felt object in each. I made the cupcake & heart free-hand. The bird and teapot were made using a K&Co stencil pattern kit, which I dot-to-dot traced on a piece of felt. I then used embroidery floss to hand-stitch the images and then cut them out & glued each to a square. I love the effect! I actually just picked the kit up off of a clearance end cap at a local craft store. I wasn't even sure what I would do with it, but the little bird caught my eye. How thrilled was I to discover the teapot included as well! I added the ribbon bows at the last minute. I think they sort of tie in with the other 2 pictures.
I've had so much fun making sweet little crafty things for Isabella! And being involved with SU has made it so easy with all the adorable little accessories & Big Shot dies! Check back soon- I have used the pennant die to cut out a pennant for each letter of her name. I plan to put it together to hang in her room as well!

Saturday, December 4, 2010

Season of Friendship

What a fitting card for our first snowfall of the season today! The kids were excited about it and got to make a quick run outside to 'touch' the snow!
I continue to love the Season of Friendship stamp set! There's so many cute ways to use it and here's a wintery one! The tree image is stamped on Crumb Cake cardstock in Chocolate Chip. I stamped the snowflakes in white ink and then used my two-way glue pen and added dazzling diamonds! So sparkly! The 'snow' at the bottom was made by tearing a white piece of cardstock at the top. I also added the glitter to that. And don't forget the sweet little bird! I cased this idea from this blog- changed it slightly. A quick, cute, and seasonal card!

Christmas Flower Brooch

I re-did the fabric flower brooch from the post below. I wasn't happy with the 'floppiness' of it. Depending on the fabric, you will need several layers of each flower piece to make it look right, which is one of the changes I made. I also decided to add an antique brad to the center, which added alot, in my opinion. Here's the die cut ingredients layered to make this brooch: 2 of the large flowers from the Island Floral Bigz die, followed by 2 tulle circles from the Circle #2 die (the large), then 2 scallop circles, and topped off with a small flower- also from the Island Floral die. Before inserting the brad, I slightly frayed the edges of each die cut with my fingers. Lastly, I attached the pin to a small piece of felt on the back, using hot glue.
Pretty, festive, and slightly vintage looking! I love the no-sew! I'm looking forward to wearing it soon!

Monday, November 22, 2010

Christmas Projects


Here are a few cute Christmas projects. They're simple yet festive!

I used the Top Note die and Big Shot to make the little tote bag. A white sack is sandwiched in between and would be perfect for holding a gift card or a small present. The ornament on the front is a combination of 3 punches from the ornament punch, giving it a 3D look!

I couldn't resist using the adorable owl punch in Christmas colors. Do you like his little tie? I'm thinking of adding googly eyes for a fun touch.

The fabric brooches were made using the Island Floral die and the Big Shot. It's hard to see, but there are several layers and I also used some circles in a sparkly tulle. The edges are pulled for the 'shabby chic' look and everything is held together with a simple brad. I actually made these before I received my SU Christmas fabric. I now have it now, though, and will post a wreath project using the fabric, soon!


Monday, November 1, 2010

ABC's of the Perfect Handmade Holiday at 20% discount!

Now through Dec 16, you have the opportunity to purchase Amazing cards, Beautiful packagine, & Cherished gifts at a 20% discount! Choose from the bundles below! Click on the picture above to download the pdf flier. Email me to order!

Tuesday, August 24, 2010

Open House Make-&-Takes + a FREE gift for everyone!

Here's the make-&-takes for my Open House Monday evening. This simple card features the new Friends Never Fade stamp set + Greenhouse Gala designer series paper. I love the bright and sunny Daffodil Delight! The 1 1/4" squre punch was used to punch the ds paper. The wording is from my new Fabulous Phrases set! I've been in need of some new word stamps. And the clear mount option is perfect for aligning 2 or 3 words together.


I also made each attendee a personalized little notepad. These feature the Newsprint DS paper, which I also love!! The red circles are Poppy Parade, which really looks great with the black/white. The monogram letters are from the Lovely Letters set, but this would also look great with the Rough Type alphabet- which was what I originally saw this project used with!I used the Bigz Scallop Circle die. The inside of each notepad is regular lined notebook paper, which actually runs through the Big Shot very easily. There's about 25 sheets of paper in each notepad and I think about half of them could be run through the machine at the same time. I used my Crop-o-Dile to punch a hole and tied it all together with some retired ribbon I had on hand. Definitely a fun project that makes a great personalized gift!

August Class Projects

Thanks to the 5 ladies who attended my August class last night! You all made it a successful evening! I hope everyone enjoyed the projects. I always love it when something is new to everyone! For those of you who missed out, we made a total of 4 projects:


2-in-1 Basket.I love that this is held together by a little binder clip ring, decorated w/ribbon! This basket uses a 6x6 piece of ds paper. Score at 2" all the way around. Then, score from each corner point to the middle & fold points in. Click here for a tutorial on how to make this PLUS the other basket option.


Owl Punch Paper Clip Bookmark. I love this little guy! And so easy- just choose your paper and punch! The hardest part is putting the tiny black eyeballs on the whites of the eyes. I used my stylus to help position them onto drops of liquid glue. The finished owls (front/back) were attached to the jumbo paper clip using large glue dots. Someone mentioned that you can find the paper clips at the dollar store! I think I got a big pack of these at the office supply store awhile back. If you don't own this adorable owl punch, you must get it!

Origami Shadowbox Card. I thought this was very striking! Love the effect! Just a square w/a few folds. Click here for detailed instructions.

Stencil Emboss Resist Card.This card kind of has a 'vintage' feel to it. You can get the stencil through SU and there's lots of possibilities for using it & it's very inexpensive! I lined this one up on vanilla cardstock and left a little off the paper. Then, I smooshed VersaMark on top of it, poured on clear embossing powder, & heated with my heat gun. Next, I used a sponge to apply color around the stencil. The embossing part of it 'resists' the ink and makes the image pop out! You can watch a video tutorial here.

If you have any questions, drop me an email!

My 1st Rag Quilt!

Here's my 1st attempt at a rag quilt! I've made several of the rag quilt bags, so I thought I would give the quilt a try. It was basically the same- just more squares. And actually, after finishing, I wish I would have added even more squares! If you ever try this, keep in mind that if you don't pre-wash your fabric, some of the pieces might shrink during the wash/dry rag process. Plus, the scallop edges kind of curl up more and I just think the whole thing kind of looks smaller. I made this one 6x6, so it's small and could be considered a lap quilt. I used Beatrix Potter flannel fabric + several others including cotton, chenille, & fleece. They all worked great together and give the quilt lots of texture. Here's some basic instructions and some pics of the assembling process.

1. Cut squares w/scallop square die through Big Shot. You will need squares for front & back of quilt.

2. Cut cotton batting 3 1/4" x 3 1/4". One piece for each square 'sandwich.'

3. Use sewing or all purpose glue stick to hold batting in place between each sqaure.
Sew an 'x' on each sqaure from corner to corner. This gives it the quilted look.

4. Lay out and then pin all sqaures together- scallops up.

5. Begin sewing- piece by piece in each row. You should end up with long strips of sqaures sewn together. Aim to sew your seams at the same place on each 'sandwich.' I think mine were a littl under 1/2" and I actually put a mark on my machine to guide me.

6. Then, each strip has to be sewn to the one above it. Pin before sewing and LINE UP seams! This will make a difference on a quilt! I had to re-do several of mine. Also, the chenille fabric I used kind of stretched, so it made it a bit more difficult. Here's a pic of the back (where you can really see the seams) before I re-did some of it. You can see where I was off.

7. The final sewing step is to sew a seam around each outside edge.

8. And to finish, throw it in the wash on a gentle cycle and then dry! This starts the rag quilt process which will continue w/each wash.


That's about it! I actually started this one last Sunday. I cut all the squares and sandwiched them together with the batting. It took me a couple of hours. Then, I did the sewing Thursday evening & finished it up Friday evening. I think I'm definitely getting better with each project. It just takes time for beginners, but don't give up! I love working on something and going through each phase of putting it together and in the end, seeing the finished product.

Sweet Little One

The Fox & Friends set continues to be one of my favorites! There's just something about those cute little animals! Here's yet another card using this set. I whipped this one up literally in a matter of minutes right before I needed it. I used the Square Lattice embossing folder for the olive cardstock background. I love the texture it leaves! Then, each adorable animal was stamped and then punched with the 1 1/4" square punch and taped to a chocolate chip background. I used the word window punch for the words, which are from a retired baby set, I believe. The ribbon is the new Marina Mist in grosgrain. Don't you love the little heart the monkey holds? SO sweet and easy- I used the small heart punch! If you don't have that one, you should really get it. For only 5.95, it's a bargain & I have used it ALOT! Ok. Yet another quick & simple card!

Wednesday, August 18, 2010

Sesame Street Punch Card


Isn't this the cutest card?! I've seen these floating around on various blogs and on splitcoast for awhile now, but have never had the chance to actually make one. I decided to put this one together for my nephew in Ohio who just turned 2. He loves Elmo! Actually, what toddler doesn't?! All of the characters & their facial features were made using punches! Let me know if you have questions about the exact ones I used. The hardest part was adhering the tiny black eye balls! Y0u can search for more 'Elmo punch cards' on splitcoaststampers.

The Last of my Baby Thank-You's!

I can't believe how many baby thank-you's I've had to make, especially with this being my 4th child! All the gifts and meals have been much appreciated and a true blessings to us. I have to admit, I was seriously tempted to buy store-bought thank-you's, after letting my list pile up! Plus, we received several more gifts on our recent trip to Ohio! Instead, I cut 20, 3x3 whisper white cardstock pieces, stamped a monkey or owl (from Fox & Friends) on each + 'thank you' & taped each one to a 4x4 card in pacific point, real red, tempting turquoise, & pumpkin pie. Very simple and quick. I did this after the kids went to bed one night. Now I'm officially caught up & I didn't compromise the hand-made quality! I actually got the idea from a new blog I was referred to. Check it out here.

Tuesday, August 3, 2010

Aviary Fun!


As I mentioned in my previous posts, I've really been into case-ing cards, lately! I guess all of my creative energy is running a bit low. Usually the extent of my creativity is coordinating 3 kids' naps to happen at the same time! LOL! Anyway, to give credit where credit is due, this card inspiration comes from stampwithheather. The only thing I basically changed was the buttons, some of the paper dimensions, & the greeting, but I wanted you to at least see the set, if you haven't yet noticed it! I think I also changed some of the bird positioning. I love how this card uses so many new and bright colors! And the birds are adorable! When I originally saw this stamp set in the new catalog, it was instantly my favorite. I bought this one in the clear mount
which makes it pretty easy to line everything up. What a fun set!

Kind & Caring Thoughts


This is a card I recently 'whipped up' using the Kind & Caring Thoughts retired hostess set. It's actually case'd from the Summer mini catalog! I love the long look. You'll see that I'm caseing alot of cards these days! I love simple stamp images and this one features shadow-like plants and flowers which are great for tone-on-tone looks. The butterfly is popped up with dimensionals, after cutting it w/my Big Shot from the Beautiful Butterflies die. I used jumbo eyelets and hemp twine for embellishing the side. Since I had the inspiration, I literally made this one in about 10min! Just my kind of card!

I gave this to a wonderful couple at my church who graciously allowed our ladies Bible study to 'shop' on donation (to the church) from their garage full of unwanted home decor items and furniture! It was the best 'sale' I've ever been too! It's also allowing me to somewhat re-decorate my living room, so maybe I'll post before and after pics soon!

Friday, July 30, 2010

Celebrating my Dad's Retirement!

This is a card I made to send to my Dad. Today is his last day of work and he's officially retiring! I'm so happy for him. He will be so much less stressed and relaxed (hopefully!). As a special gift, we also ordered Cleveland Indians tickets for him and my mom.
This is also one of the first non-baby thank you cards that I've made since Josiah was born! I've mentioned it to a few people, but I actually had to dust cob-webs off my poorly neglected stamp area!

In case you're wondering, I did not come up with this on my own. It's a case from a card on splitcoast (click here). The most creative I get these days is coordinating 3 kids' naps to all hit at the same time (rarely works)! I changed the colors and used: Pacific Point, Bashful Blue, Pear Pizzaz, and Real Red. These are all colors from the Birthday Bash Suite in the new catalog. I love how SU suggested color palettes for various occasions!

I used the Top Note die and the Stars #2. I just kind of randomly layered the stars. The hardware is non-SU, as is the 'celebrate' sentiment. This is a pretty simple card, but believe it or not, it took me half the day to make!

Tuesday, June 15, 2010

Welcome Baby Josiah!


Josiah David Bishop
June 9, 2010- 1:20pm
9lbs, 6oz and 21" long

Tuesday, June 1, 2010

Baby Thank-You's

No, I have not had my baby- yet! 6 more days and counting! But I have started a batch of thank-you cards. I was completely blessed & spoiled with a church shower on Saturday! I say spoiled because most people don't have showers with a 4th baby! But we believe every baby is a special blessing and celebration & so do my church friends! Anyway, I decided I better get started on my thank-you cards, as the gifts keep coming in! Josiah will definitely be well-stocked with diapers & wipes!
This card actually has little stamping, but the inspiration came from a tiny sailboat stamp that I have from a retired set. I decided to try to re-create the image & used punches to do so. The bottom of the boat is half of a 1" circle. The sail on the boat is half of a 3/4" square. The boat image is layered on a 1 3/8" circle and then a scallop circle. Notice the tiny button- it's one of the clear bitty buttons from the new summer mini! I tied some blue thread through it and used a glue dot to adhere it to the card. The patterned paper is from last year's SAB package- prints that are perfect for a baby boy! I stamped on the white scallop trim & that completes the card! I love making cards in batches. A hint- cut, punch, & assemble all pieces before putting the cards together. And sometimes this has to be done in several sittings, but it's much quicker than trying to put together one card at a time.