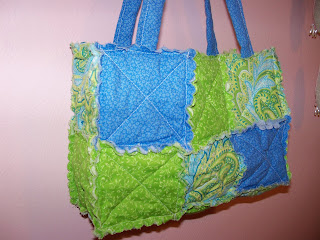
Well, I finally got the opportunity to play around with the Big Shot for a sewing project! My grandmother recently gave me her sewing machine & I was excited about trying it, although I have no sewing experience! Through the blogging world, I kept hearing that the rag quilt purses were so easy and no big deal! Well, they were basically right!
This was a fun project and pretty much on a beginner level. My mom, who is a veteran seamstress, actually helped me. I was fairly pleased with how this turned out, however, I did use the wrong batting. Apparently there's a big difference between cotton and polyester batting- I had no clue. The cotton batting (preferred) gives a more stiff affect to the bag & a little more form. I was super frugal in choosing my fabric, but I really like the color combo. One half yard of each pattern cost me a little over $4!

I used the Big Shot and the scallop square die. I cut the fabric appx 5"x5," layered 8 pieces at a time, and ran them through the Big Shot. I can definitely see how quilters would benefit from the scallop square! The die eliminates tedious cutting and measuring.
I cut a total of 32 squares. Each is sandwiched with another square + a piece of batting in between. The first step was to sew an 'x' across each sandwiched block. Then, the scalloped edges were joined and sewn together as well. You can find a great step-by-step tutorial
here.
I neglected to add a clasp before sewing the final edges, so this is an open bag. I thought about adding some velcro for a closure and some buttons on the outside to dress it up. The bag can be turned inside out for the clean-edge look or as pictured for the rag quilt look. I did have to go back and snip all the edges and wash/dry the entire bag to give it the final 'rag' look. I really need to get a sharp pair of scissors for fabric cutting!
There are several variations to this bag and it's easy to adjust the size. I'm looking forward to trying another one of these soon!- preferably in a larger 'tote' size.
 Here's the rest of the Easter class projects for Monday night (see post below for the watercolor card which is also included). I love the fresh, springy colors! They're fairly easy to put together. Each one features a different embellishment that can really make a big difference in a card. Various sentiments may be substituted for occasions other than Easter. The 4x4 'Happy Easter' note card uses one of the Beautiful Wings Embosslits butterflies. The perfect finishing touch!
 The 'Happiness Always' card uses the SU Beautiful Butterflies die & vanilla hodgepodge hardware- always a WOW factor!
  I used Sweet Pea stitched felt + a button on the card with the cross.
 The basket is from the Baskets & Blooms SU die & a simple bow tied w/grosgrain ribbon.
 Click on any pic to enlarge. I still have space in Monday night's class, $10. Just drop me an email to join! Since I was so late in putting this all together, I will accept late RSVP's all the way through Monday. OR, if you can't make it to the class, I can put a kit together w/instructions.


